Hello guys,
Today we are going to make an Arduino project. This
project was done in 4th semester by me and my friend, Sagar. Well,
his name is also Sagar and mine too!!!
Let’s discuss about the project aim.
We are going to make a circuit which contains 3 LED. And we will write an
arduino sketch to control the speed of LED Blinking. Here, we are going to make
LED blinking with variable the speed. That means, LED blinking process will
initially start with slow speed, then it will increase the blinking speed. And,
Then again it will slow down the speed... You will need Arduino Uno R3 for this project. If you don't have one, buy it from below link.
https://amzn.to/2QRr2IW
https://amzn.to/2QRr2IW
Circuit Diagram
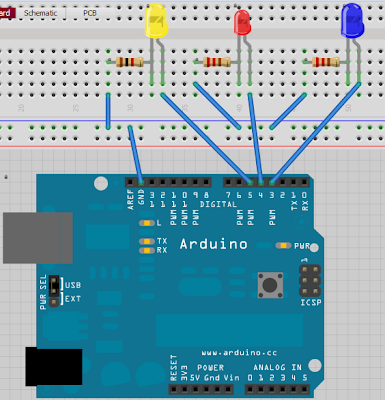
So, for circuit, make
the connection shown in the figure with arduino board. Connect digital pin 3, 4 and 5 to LED via 1k register. Here make sure you connect LEDs via register. If you will not
connect register, there may be possibility of high current through
LED, which may result in short circuit the board.
Schematics of Arduino UNO R3 connected
with LEDs
To write a sketch, open a new sketch by clicking the new in file menu.
Let’s understand the algorithm first, and then we will write the code. So
starting with an algorithm…
Algorithm
To get the LED on and off, we are sure that it needs some time to stay
either ON or OFF. In other words, we can say that if LED is ON for certain
time, let’s say 2 seconds and then it will be in OFF position. So to do this,
Arduino sketch provides inbuilt function called delay. Delay is pauses
the circuit performance and waits for some time. When the delay is called the
argument is passed to that function is time in milliseconds. So, for our case,
an algorithm of glowing LED for 2 seconds and then LED goes to OFF stat is
below:
LED ON
Delay(2000)
LED OFF
Now, to perform LED blinking in varying speed, we are sure, that we need
to somehow change the delay time of an LED to remain in ON and OFF stat. So the
main funda is to change the argument to function delay with change in time…
that’s it.
So, let’s look at the code…
Here, first we initialize the variable j=1. Then, we are going in the
loop. And in loop we will check the condition for variable j to be less
than 20. If, j is greater or equal to 20, then it will be
initialize to 1. Now, we will define int l=abs(10-j). which will
give the absolute value of (10-j). This is important thing if you want
to design decreasing and increasing speed both by one loop. Then, we will
write, int k=1000-(100*l). So, variable k will be in decreasing
value function with time till j=10. Then, it will start increasing up to
j=20. Now, write the statement to glow LED with calling the delay
function with passing variable k as an argument. And the code is done…
Following is the code.
Check it…
CODE
int ledPin1=3;       //Initialize ledpin1 = digital pin 3 of arduino board.
int ledPin2=4;
int ledPin3=5;
void setup()
{
  pinMode(ledPin1,OUTPUT);  // Set ledpin1 (i.e. digital pin 3) as output pin
  pinMode(ledPin2,OUTPUT);
  pinMode(ledPin3,OUTPUT);
}
int j=1;
void loop()
{
  if(j==20)  // Check if j==20
  {
    j=1;   // if j==20, set j=1. So that the circuit will start again
  }
     int l=abs(10-j);  // Absolute value of (10-j) = l.
     int k=1000-(100*l);  // Setting the delay function argument
     digitalWrite(ledPin1,HIGH); // ledpin1 is set to high i.e. ledpin1 is ON.
     delay(k);  // Delay of k milliseconds
     digitalWrite(ledPin1,LOW);  //ledpin1 is set to low i.e. ledpin1 is OFF.
     digitalWrite(ledPin2,HIGH);
     delay(k);
     digitalWrite(ledPin2,LOW);
     digitalWrite(ledPin3,HIGH);
     delay(k);
     digitalWrite(ledPin3,LOW);
     delay(k);
     j=j+1;  // incrementing the value of j
}
Check out this circuit in progress in following video.
That's it buddy. I hope you will do this little project. And make some innovations like first decreasing and then increasing functions, exactly opposite to mine.
That's it buddy. I hope you will do this little project. And make some innovations like first decreasing and then increasing functions, exactly opposite to mine.
Thank you. Good bye...

No comments:
Post a Comment